

Near the harbour of Skjold (Skjoldehamn), on the island of Andøya, which is on the western coast of Norway, and 300 kilometers inside the Artic Circle, a body was found in 1936 in a marsh. The fully clothed body, and its garments have been analyzed repeatedly since the discovery, first by Gutorm Gjessing in the 1930’s, then Per Holck in the 80’s, then Nockert and Possnert, in the late 90’s, and most recently, by Dan Halvard Løvlid in his 2009 thesis. Most recent analysis suggests the finds should be dated from 1050 to 1090 CE, or, the late 11th century.
Consensus on the gender and ethnicity of the find has been difficult to find. Løvlid (2010) has published a relatively strong argument for it being a Sea Sami, but points out the similarities between Norse and Sami garment traditions in terms of cut and influence. Each of the garments have interesting details for the reenactor, and the excellent summary by Rebecca Lucas (known in the SCA as Ásfríðr Ulfvíðardóttir) is a great starting point.
I’ve chosen to focus just on the hood, as the square gores inserted front and back of the Skjoldehamn hood are a distinctive marker in current reenactor fashion of “Norse” as compared to generic European hood styles of the time. There is evidence in the Greenland finds (dated to about the 13th C) of both hoods with only front & back gores, but the shape of the inserted gores are normally wedge shaped. Hood finds in both Greenland, and medieval London (about 14th C) have front & back gores as well as gores on each shoulder, all which are wedge shaped.
The hood cut, both the main square shaped body, and the square gores, are very conservative of fabric. The later hoods, with wedge shaped gores, can be cut to conserve fabric, but the shaping in those hood cuts does create some waste fabric. This in keeping with overall garment cut trends, where 11th C body garments use primarily geometric construction, while more shaping develops over the centuries.
This tutorial presumes you are in possession of a kit from me, although you can easily cut your own pattern pieces, by looking at the examples in this album. The various kits are cut, if possible with the original cut, with the face opening in the center of the large square, and in a roughly accurate size. Some of the kits are in a “tween” size, which may fit some adults, but will likely not fit adult males.  The kit fabrics are re-purposed modern garments in period acceptable fabrics, of wool, linen, and the like. (Of course, the original was wool.) Very well fulled wool can have seams and hems that are folded only once, or even no fold at all. Wool that is less fulled, and all linen & silk, will need to have double folded hems and seams, but these finishing techniques will work with both single & double folded seams.
The original hood uses a variety of finishing techniques, each with a different purpose. An excellent one-page summary provides this image.
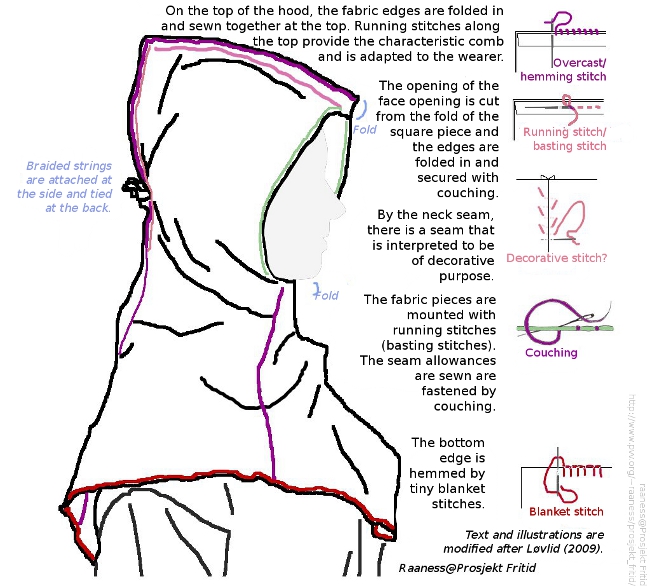
The only seam treatments that are specifically contrasting in color are the couching stitches around the face opening. All other seams are sewn with thread that does not contrast. I believe the stitching thread generally matches the basic fiber – wool with wool, linen with linen. (I can’t read the Norwegian thesis to positively confirm.) This is a general practice on many extant garments. You are of course free to choose the color and fibers you have available or wish to use.
Even though the top of the hood in the kits has been machine assembled, the hood will look much better if you whipstitch along the top seam. It helps give definition to the top of the hood. I originally was going to omit that line of stitching on my hoods, but it needed it. Whipstitch is quite simple, and worked from the top of the hood, holding the folded seam together. This is an opportunity to practice using small stitches, but don’t get obsessed with teeny tiny stitches. Stitch spacing between 1/4 and 1/8 inch works well.
Around the face  opening, the cut fabric is turned in, and a thicker cord or yarn is laid along the cut edge (or the double fold) ON THE INSIDE. The contrasting thread is used to couch the thread down. Work from the inside, with the thread going horizontally across the couched cord, and diagonally on the outside of the hood. The stitches are not huge, and the decorative effect is subtle. The couched thicker cord helps give structure to the face opening.
The drawings seen here come from Løvlid’s thesis.
Around the lower edge of the hood, use a blanket stitch, as illustrated above. If you have well fulled wool, you don’t even need to fold the edge up at all, but can if you wish. (If you can easily pull a thread from your fabric, you need to double fold the hem.)
At the top of the hood, the original had multiple lines of stitching that creates a “mohawk” effect. This is a detail that is often NOT replicated by American reenactors. I highly recommend you try it on at least one hood, and then decide if you like how the hood wears. The following image shows how the multiple rows of running stitch are placed. The top line goes through both outer layers, and through the inner seam allowances as well. The next row of stitching encapsulates the raw edges. If you do not replicate this detail, you will need to finish the seam allowances in some way, perhaps using the “oblique basting stitch” as on the rest of the gore seams.

The rest of the seams are done with a fairly large stitch, probably about 1/4 inch apart, and worked as seen in this image. Work this also from the inside, and try to avoid flipping to the outside to check how your stitches look. This stitch does reinforce the seam, as each horizontal stitch on the inside crosses the seam.

After crossing the seam, aim up diagonally, and catch your seam allowance when you come up. This stitch works very fast if you can avoid getting obsessive about how the stitch looks on the outside. Start with the back seam or back gore, and by time you are working this finish on the front gore seam, your stitches that are visible on the outside will be fairly even and nice looking. Remember, however, that this seam treatment is primarily to finish the seams, by making them lay flat, and reinforcing the join, as the horizontal stitches cross from one side to the other. The original hood did NOT use contrasting color thread, nor were the stitches “perfect.”

The final detail on the original hood are cords attached near the ears. If the cords are tied behind the hood, your peripheral vision is improved. If tied in front. the hood is further secured tightly around the chin. The cord is braided with 4 double strands. It appears that “viking” whipcord braiding may create the same braid structure as the original artifact, although I am not aware of any conclusive evidence that weighted bobbins were used in the Norse period. From my experience braiding the four strand by hand, I think the weighted bobbins would be helpful to maintain an even tension. The cords are commonly omitted by American reenactors, but the peripheral vision provided is important.
The hood cut is generally close fitting around the neck, and the hood doesn’t necessarily cover more than the shoulder tops. For a very thickly built wearer, you may need to add additional gores at the shoulders. In keeping with the rest of the cut, I would add square rather than curved gores. The current fashion among American reenactors has a very large square, so the hood covers the upper arms, and much of the chest & back. This may be comfortable in regions NOT above the Artic Circle, but it is a definite step from the historic example.
I hope you enjoy learning about these various finishing techniques. Each has a functional effect, with any decoration as a bonus secondary effect. The stitching on the gore and back seams helps the hood lay flatter and the hood just looks better. The cord that is couched along the face opening helps stiffen the opening, and prevents friction from affecting the cut/folded hood edge. The “mohawk” on the top stiffens the hood, and possibly provides some comfort benefits while wearing in a cold, windy environment. Remember that the original location is on the same latitude as Point Lay, Alaska or Murmansk, Russia. For modern reenactors (not serving at a historic site), making a version in linen or silk is a very reasonable option, as the hood would be more of a fashion item rather than a necessary protective garment, depending upon the time of year and local climatic conditions.
I have a pinterest board with links, which will be updated periodically.


How does one determine the measurements for an individual? Is the side of the square some multiple of a meaurement from the top of the head to the top of the breastbone or of a measurement across the shoulders?
Sorry for the long delayed reply. This is a pretty flexible design, and doesn’t have to be exactly square. As for size, the most important measurement is from the top of the head around the face to under the neck – you want the opening to be at least big enough that the face will fit. I’d take that measurement and double that, then add about 1-3 inches for ease, and use that number for the size of the overall square. You might double check that from the eye around the back of the head back to the eye is no larger than the overall square you’ve chosen. (I have friends and one kid with very large heads.)
The original hood was made for use in a cold climate, so fitting closely around the neck was important. Many larpers & re-enactors make a version of this hood that is very large, and ends up covering down to the belly button. After all, much of the US is far warmer than the Artic Circle, so larger (or made of linen) is a reasonable choice.
Hi and thank you for finding my one page summary!
However, the one page summary and figure on my blog is also available in English.
http://www.pvv.org/~raaness/prosjekt_fritid/?page_id=3295
—
A. M. Raaness
I’ve updated the image and link. Thanks so much!
Thank you for this! I will be making 5 of these for my family and often find that period construction has practical benefits that look-alike versions lack but had trouble finding a tutorial I liked. Very straightforward design here. I’m excited to get it started!